Marketing Efficiency Workflow
The speed of content production is today a critical competitive factor. This project analyzes the implementation of Generative AI in existing marketing workflows to drastically accelerate the creation of brand assets. The focus is on establishing reproducible, scalable processes for visual design.
By using advanced node-based workflows (ComfyUI) and specialized models, we demonstrate how companies can realize rapid prototyping for branding and campaign material. This shortens decision cycles and enables faster validation of marketing concepts in the market.
Workflow Optimization via AI
Technology Stack
- ComfyUI – Modular pipeline orchestration
- SDXL Turbo Checkpoint – High-speed inference engine
- 4x-Ultrasharp – Upscaling for print-ready quality
- Logo.Redmond – Consistent brand identity integration
- RMBG-1.4 – Automated background removal
Process Architecture with ComfyUI
In this section I document the technical implementation of an automated design process. By combining the “Dreamshaper-XL” model with specialized LoRA adapters (“Logo.Redmond”), we achieve consistent output quality for corporate identity elements.
The orchestration is handled by ComfyUI, which enables granular control over every generation step:
- Base Model Configuration: SDXL Dreamshaper via Efficiency Loader (1024×1024) for maximum detail fidelity.
- Fine-Tuning: LoRA integration via CR Lora Stack (Weight 0.8) for stylistic control without loss of model coherence.
- Performance Tuning: Use of Turbo mode (CFG 2, 4–8 Steps) with DPM++ SDE Karras sampler for fast iteration cycles in prototyping.
This architecture eliminates the need for separate refiners and enables integrated upscaling within a single pipeline.
For brand asset generation, we use structured prompt engineering methods with the LogoRedAF trigger to target specific style directions (Minimalist, Colorful, B&W). This ensures that generated assets conform to design guidelines.
The example prompt for our logo is:
frogs surrounded by grass logo, ultra-violet, lora:LogoRedmondV2-Logo-LogoRedmAF:1
With this input, we generate a unique and high-quality logo, produced through the combination of Dreamshaper-XL’s capabilities and the specific adaptations of the Logo.Redmond LoRA model.
Summary of Steps
- Configure Efficient Loader: Load base model SDXL Dreamshaper and set to 1024×1024.
- Connect Efficient Loader to the CR LoRA Stack.
- Load LoRA model: Using the CR Lora Stack with the appropriate weights.
- Enter prompt: A specific prompt for creating the logo.
In the next step, we create our first base image. To do this, we connect the Efficient Loader to the KSampler Adv. (Efficient) and switch the sampler to “DPM++ SDE” or “DPM++ SDE GPU” so that results can be generated faster using the GPU.
Through this configuration and the use of powerful samplers, we can ensure that our base image is created quickly and efficiently without sacrificing quality.
Image Upscaling to Increase Quality and Resolution
In the next step, we want to upsample the base image to increase quality and resolution. Here we use various nodes to achieve finer detail accuracy and a higher resolution.
First, the image is scaled up fourfold using the “4x UltraSharp” model. This model is known for working out fine details particularly well and significantly improving resolution. Immediately after, the upscaled image is downscaled again using a bilinear method to achieve a final resolution of 2048×2048 pixels. This step ensures that the image details are preserved while keeping the file size manageable.
After bilinear downscaling, the image is encoded. This is done via the “VAE Encode” node, which prepares the image for further processing. In the subsequent phase, a new KSampler is used, configured with the same values as the previous one but with a Denoise setting of 0.35. This lower denoise setting ensures that the newly created image stays close to the base image with as few deviations as possible.
Through this methodical approach, we ensure that the image retains high quality and detail accuracy while being scaled to a practical size. The end result is a high-resolution, high-quality logo that leverages both the advantages of the upscale model and the precision of the new KSampler.
Background Removal
In the final processing step, the background of the image is removed to obtain a clean and professional logo. We use the “Image Remove Bg” node and the “BRIA Background Removal v1.4” model.
Steps for Background Removal
-
Process image through the “Image Remove Bg” node: The “BRIA Background Removal v1.4” model is used to remove the background from the image. The image is passed through the “Image Remove Bg” node, where the model is applied to separate foreground from background.
-
Save image: After processing, the image can be saved as a PNG file. This format choice allows retaining the transparent background, which is ideal for logos and other graphics.
Result
After successfully removing the background, we obtain a clean, professional-looking logo that can be used flexibly, whether for websites, promotional materials, or other applications. The image can now be saved as a PNG file to preserve the transparency of the background.
With these steps, we have completed the entire AI-driven logo and graphic creation process, from initial image generation through upscaling to final processing.
The end result is a high-quality, detail-rich logo created using state-of-the-art technologies and models.
Using the PNG Image with the PlaceIT Platform
The final step in my process is to place the finished PNG image on a mockup platform like PlaceIT. This step is crucial for presenting the logo in realistic usage examples, for example on a mug or other promotional item.
Here is how I proceed to optimally integrate the image into a mockup:
Step-by-Step Guide to Using PlaceIT
-
Upload PNG image: After the logo has been saved as a PNG file by removing the background, I upload this file to the PlaceIT platform. PlaceIT is a user-friendly online platform specializing in creating mockups.
-
Select mockup: On PlaceIT, I select a mockup design that suits my needs. The platform offers a wide variety of templates including mugs, t-shirts, posters, and other products. For my logo, for example, I choose a mug.
-
Adjust image: PlaceIT provides an automatic adjustment function that adapts the uploaded PNG image to the dimensions and orientation of the chosen mockup. The platform recognizes the product’s contours and adjusts the logo accordingly to ensure it is perfectly positioned on the mockup.
-
Fine-tuning and preview: After the image is automatically adjusted, I review the result in the preview. Here I have the opportunity to make minor adjustments to ensure the logo looks exactly as I envision it. PlaceIT allows me to slightly change the size and position of the logo for the best possible presentation.
-
Save and download mockup: When satisfied with the result, I save the mockup and download it in the desired quality. The platform offers the option to save the mockup in various formats and resolutions, giving me flexibility for different application purposes.
Result
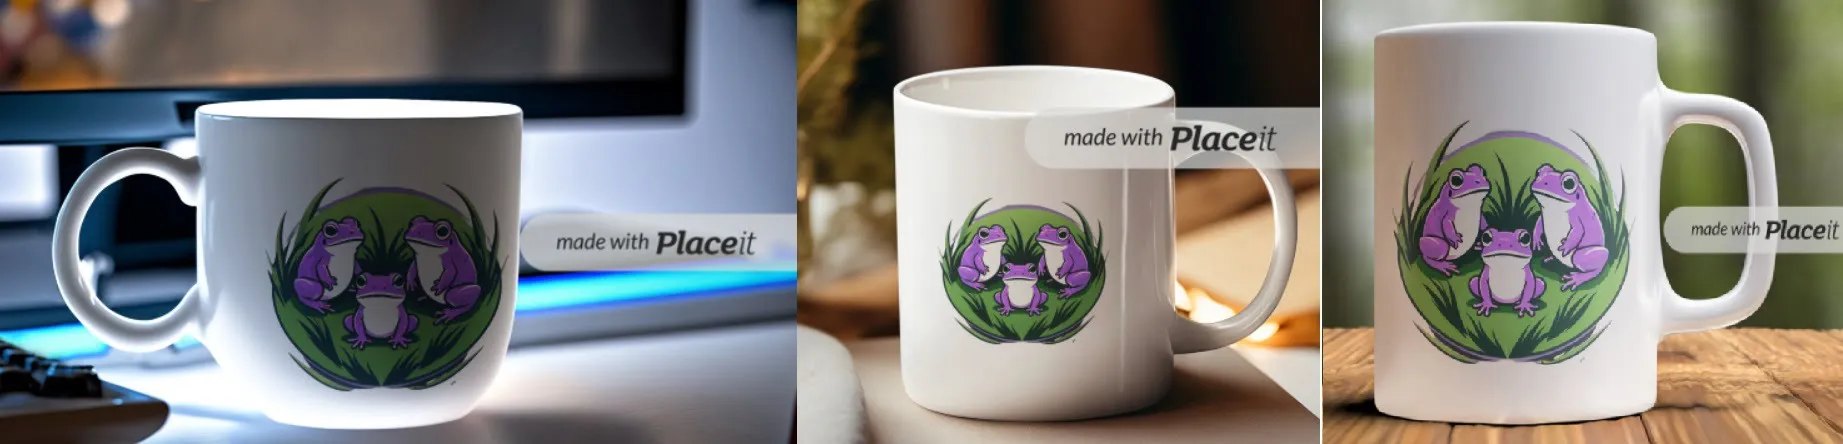
By using PlaceIT, I can present my logo in a realistic context and get a visual sense of how it looks on various products. These mockups are particularly useful for presentations, online shops, and marketing materials, as they provide a clear idea of how the logo will perform in the real world.
This final step rounds out the entire logo and graphic creation process by presenting the finished design in an appealing and professional format. By using PlaceIT, I can ensure that my logo is showcased to its full potential and ready to be used across a range of applications.
Final Note: Integration with Print-on-Demand Providers
After the logo has been successfully created and integrated into an attractive mockup, the possibility opens up to further use this design via print-on-demand providers. With print-on-demand services, I can have my designs printed on a wide range of products such as mugs, t-shirts, posters, and more, without needing to purchase large inventories upfront or manage stock.
By using print-on-demand services, I can offer my logo on a variety of products and thus open up additional revenue streams. The easy integration and lower upfront costs make it an attractive option for marketing and selling individually designed products.
Important Note on Licensing Rights
Before using the created designs for commercial purposes, I want to point out that the models and tools used in this process are typically licensed for non-commercial use. It is essential to be aware of the license terms and usage rights of the respective models to avoid legal issues.
License Rights and Terms of Use
-
Review model usage: Make sure you have thoroughly read and understood the license terms of the models used, such as “Dreamshaper-XL”, the “Logo.Redmond” LoRA model, and “BRIA Background Removal v1.4”. Many of these models may only be licensed for personal or non-commercial use.
-
Clarify commercial use: If you intend to use or sell the designs or mockups commercially, review the specific license agreements and ensure you have the required rights. In some cases, additional licenses must be purchased or special permissions obtained.